Setting up a Pi home media server
February 14, 2021
Intro
For many years I have had a dedicated computer running Arch as my home server. This takes up a decent amount of space, although it looks very good in my Fractal Designs case. The main purpose of the server is to run Plex and be my media hub. I also use it to run various services (MQTT server, databases, web servers, etc.) on my local network to facilitate my numerous hobby projects. The services are mostly managed with Docker, because I feel this is very easy to use and provides isolation for the services. With the release of the Raspberry Pi 4, I’ve been wanting to try downsizing my home server, so I picked up the 4GB model. Most of my videos on Plex “direct play” on the client, so I don’t need to transcode on the server. If I run across something that does require transcoding, I usually go ahead and covert it into a “direct play” capable format using HandBrake. I also have a Plex server running on my MacBook that can handle the occasional transcoding if I want to take a video with me on my iPhone or IPad. This article will detail my setup of a new Raspberry Pi to be used as a Plex server with all of my media stored on an external drive. Docker installs of SABnzbd and Sonarr could be easily added if desired.
Installing Raspbian
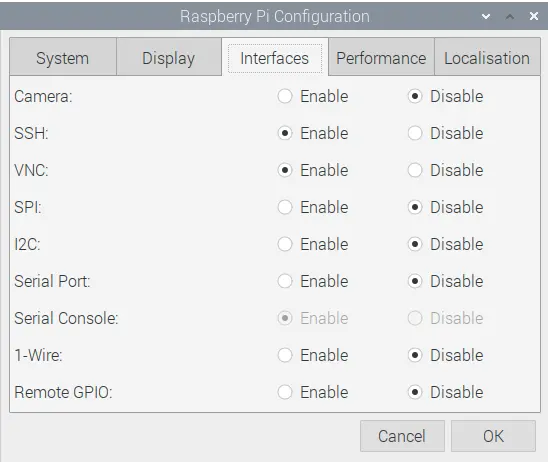
For installing the base system, I went the easy route and used the NOOBS Raspberry Pi Imager. This is a tool to easily setup a SD card with the Raspbian OS. On the initial boot of the Pi, there are options to configure a few basic settings. After that, I wanted to make sure everything on the systems was up-to-date, so I opened up the terminal and executed sudo apt-get update followed by sudo apt-get upgrade. Since I will be using this server without a monitor (headless), I also enabled the SSH and VNC services to allow easy access. These options can be found under Preferences -> Raspberry Pi Configuration -> Interfaces.

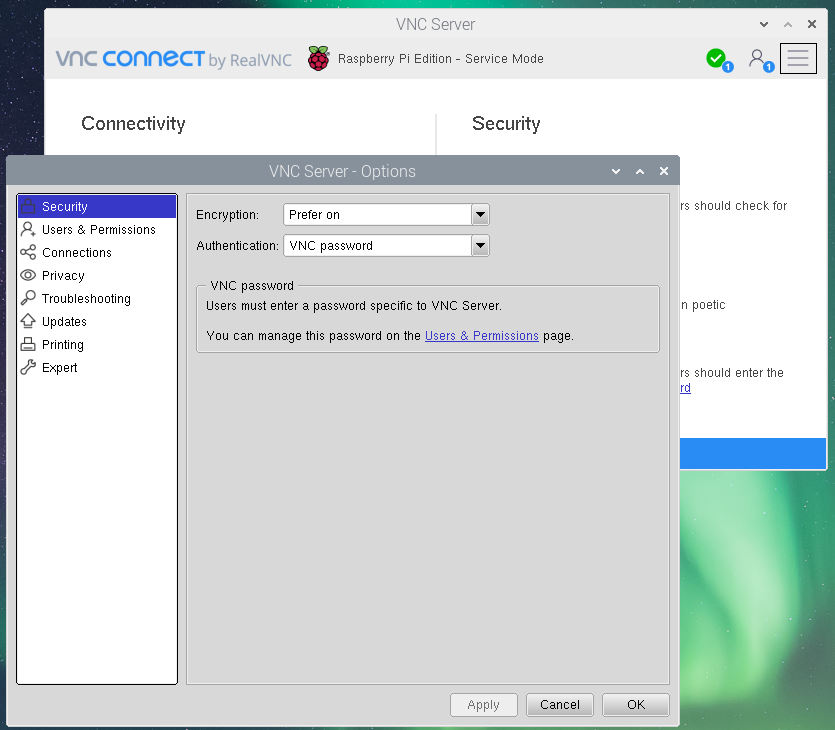
I had to customize the VNC server settings some. My VNC client of choice is Screens, but it only supports the “VNC Password” authentication method. The Raspbian VNC server defaults to authentication with the OS username and password. This is a simple setting to change though. I just clicked on the VNC icon in the menu bar and the VNC Server interface opened up. From there, I clicked on the hamburger menu in the top right of the interface and selected Options. The authentication method can then be changed in the Security section and the password can be managed in the Users & Permissions section.

Another work-around was required to get the VNC server to work in a headless environment. Without a monitor, there is no “desktop” for which the VNC server can allow access. I’ve used HDMI dummy plugs before, and they worked perfectly in this scenario. For the Pi, a micro-HDMI to HDMI adapter is also needed. The dummy plug tricks the VNC server into thinking there is a monitor connected, so there are no issues with logging in through VNC.
Setting up an external drive
I picked up a 2TB external drive to use for all of my media storage on the Pi. This seems like as good a place as any for a plug about proper backups. The 2TB drive is not the only place my media is stored, and maybe my overall backup strategy would make a good future article. For now, I’ll just say that I suggest keeping backup media in at least two locations with one of those being off-site. Back to setting up the external drive. I chose to format the external drive as ext4, because this is a native Linux format. This does present a small challenge if data is being copied from a non-Linux system. In my case, I use MacOS as my main system, but I have an old laptop that I keep Arch Linux installed on. I was able to use this laptop to copy all of my media over to the ext4 formatted drive. A virtual machine with Linux installed could also be used to copy files to the drive. I don’t want to go in to the details of this in this post, but it’s fairly straightforward to use a free program such as Virtual Box. If Windows is used, the drive could be formatted as NTFS, but don’t forget to install some NTFS drivers on the Pi to allow for mounting the drive and read/write operations. Don’t be tempted to use a file system such as FAT16/FAT32 or exFAT if the Plex server configuration folder is being stored on the external drive. Due to how Plex handles thumbnails for videos with symlinks/hardlinks, these file systems are not compatible and will lead to thumbnails not being generated for videos. I chose to create a folder in the root of the filesystem to mount my drive with sudo mkdir /nas. I also updated fstab to automatically mount the drive at boot. I like to add entries to fstab using the UUID of the disk. The UUID can be found with the sudo lsblk -f command. This is a unique identifier for the disk, and ensures there are never issues in the future if multiple drives are connected. I also added the “nofail” option to allow the Pi to continue booting even if the drive is not connected. Here is the full line that I added to the /etc/fstab file.
# mount external nas drive
UUID=86132bd4-e214-4952-a81c-99d53a8a9dd0   /nas    ext4    defaults,noatime,nofail    0    0
Installing Docker
The steps I took to install Docker on the Pi are based on the instructions found in an article on the Docker blog. I found that I only needed to use a subset of the commands shown in the article. These were:
curl -fsSL get.docker.com -o get-docker.sh && sh get-docker.sh
sudo usermod -aG docker pi
sudo apt-get update
sudo apt-get upgrade
Be sure to change the username at the end of the second line if the default name of “pi” is not used. When I performed these steps, I found that the Docker repository was automatically added to the sources file. An easy way to verify this is to run sudo apt-get update. When this runs, it will list each source that is being queried. The Docker repository should be in this list.
Installing Plex Media Server
The “config” directory can grow quite large for a large library. Since the SD card with the Pi OS is normally relatively small in size, I wanted to store this directory on the external drive. I chose to store it at /nas/plex/config. The user and group ID number is needed when creating the Docker container. This can be found by opening up a terminal and running id pi. Once again, the “pi” portion will need to be changed if the default user name is not being used. I chose to use the Plex image from LinuxServer when creating the container. They have some great images for many popular services, and they keep them regularly updated. Plex does maintain an official Docker image, but it does not support the architecture of the Pi. I’ve provided a sample of the command I used to create the Docker container.
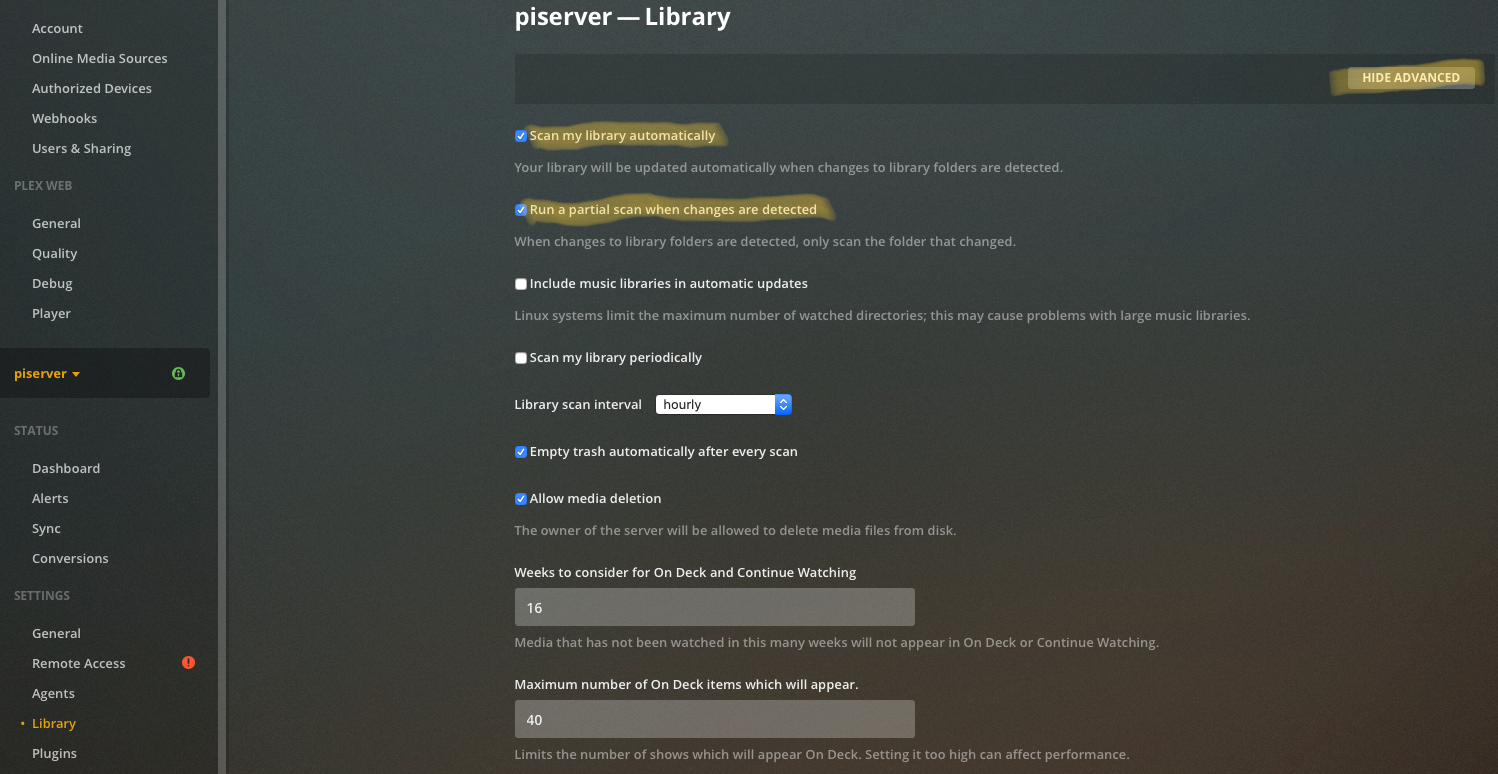
docker create --name=plex --net=host -e PUID=1000 -e PGID=1000 -e VERSION=docker -e PLEX_CLAIM=****** -v /nas/plex/config:/config -v /nas/tv:/tv -v /nas/movies:/movies --restart unless-stopped linuxserver/plexInformation for each of these options can be found on the page for the Docker image. One issue I experienced was with the Plex claim code. It is stated that the code is optional, but I had to provide the claim code to be able to initially set up the server. When signing in for the first time, be sure to go to ”http://ip.add.re.ss:32400/web” specifically. From here, libraries can be added, then settings can be modified. I’ll mention a few specific settings for the server that I like to modify. There are many additional settings that can be seen by showing advanced settings. Under the “library” section of the server settings, I like to enable automatic library scanning as well as partial library scanning. This will allow the library to be updated automatically whenever a file is added.

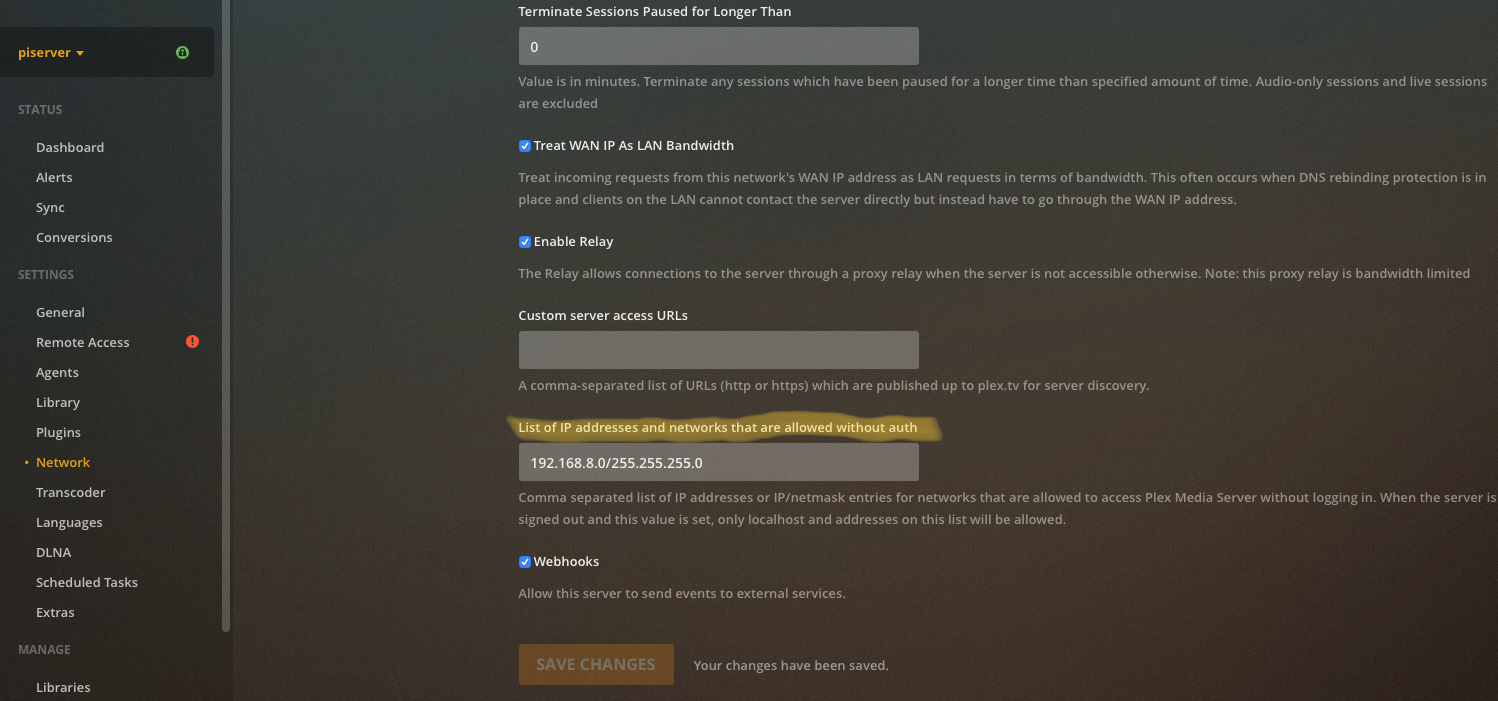
Lastly, I like to add a range of network addresses that can access the server without authentication. This can be done under the “network” section of the server settings. In my case, this allows any computer on my local network to access the server, even if the server cannot connect to the internet to verify authentication.

Conclusion
I now have my Plex server installed on a Raspberry Pi 4 with my media stored on an external drive. I hope my documentation of this process is helpful for someone. I’m not sure if this will be my new permanent setup, but it’s definitely an interesting alternative to a full size home server. Based on the usage numbers I’ve seen, I should have plenty of resources to run additional services for my hobby projects. My main concern is not having the ability to transcode video in realtime if I had a situation arise where that was necessary.